Published May 27, 2013 01:16PM
Bring it On!
From chin-ups to broccoli, here's how to take on your biggest fitness challenges and own them.
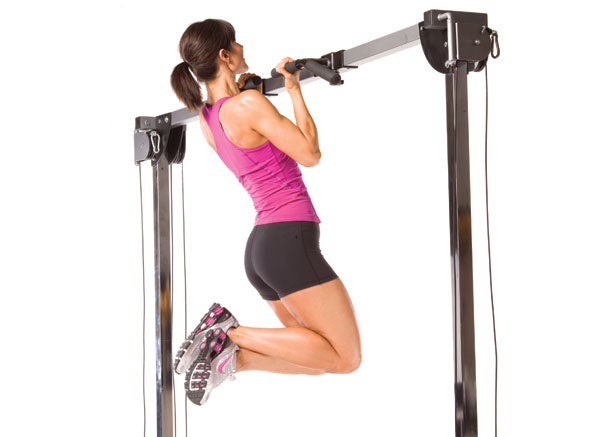
1. Do 5 chin-ups, unassisted
Time Frame: 8 weeks (with 3 strength-training sessions per week)

Benefit: Sculpt the muscles in your back and shoulders, improve your posture and help reverse the forward slouch caused by daily life. “You definitely need pure strength to be able to do chin-ups,” says New York City certified health fitness instructor Joan Pagano, author of Strength Training for Women. Try this approach for learning to chin using the Smith machine.
Step One: Set the bar at a height that allows you to hang with your arms extended (using an overhand grip) and your glutes just a couple of inches off the floor. Starting with your feet fully extended, pull your legs toward your body until your feet are squarely planted on the floor. Pull yourself up as high as you can, then slowly lower back down to the extended position. Repeat until you can perform three sets of 10 reps, resting about 45 seconds between sets. Once you can do three sets, give your muscles time to recover for several days before trying again.
Step Two: The next time you do this exercise, raise the bar another notch or two and begin with the hanging position again, this time with your feet planted more closely to the machine. Stick with it until you can perform three sets of as many reps as possible.
Step Three: Raise the bar again the next time you try this move, and repeat the process until you can pull yourself all the way up.
ADVERTISEMENT
2. Hold plank for one minute without wobbling

Time Frame: 4 to 6 weeks (working the move 2 times per week)
Benefit: Increased muscle endurance and a rock-hard core! “It’s all about energetics and how you attack the plank,” says Pilates instructor Wendy Puckett, co-owner of Steamboat Pilates in Colorado. “Anyone can go through the motions, but you need to find the soul of the move.” That’s when the strengthening happens.
Step 1: First, try the plank on your hands and knees to make sure you’ve got the form down: Your shoulders should be directly over your hands and your body should form a straight line from your shoulders to your knees (no sagging belly or sticking up your rear end). Hold for 30 seconds, then 45 seconds, then one minute. Don’t move on until you can hold the correct form the entire time.
Step 2: In full plank, focus on opening up the collarbone, softening your shoulders (don’t round up), pressing your palms wide and flat into the mat and reaching your toes back. Relax the rest of your body, really engaging your core, so you really feel your abs take hold and work to support you, Puckett says. Concentrate on breathing into your core. Drop to your knees if you find yourself breaking form – any sagging in the middle is a clear sign that your form is breaking.
MORE: The Dos and Don’ts of Plank
ADVERTISEMENT
3. Rock your yoga poses

Time Frame: 6 weeks
Benefit: Better breath control, body awareness, core strength, balance and flexibility. Need we go on?
Step 1: Tackle Triangle Pose. This is one of the more basic yoga poses (feet wide, hips slightly rotated as one arm reaches high and the other arm reaches down to your shin), but to do it correctly, you need to focus on alignment, breathing and lifting out of your core, Puckett says. “The line on the side of your body needs to be really long and lifted,” she says – and then you gently rest your other hand on your leg. The progression happens in your brain as much as your body – it’s not about how low you can go, it’s about how much you’re controlling the move with your core muscles.
Step 2: Work on Warrior III. A real test of core strength, this pose is more challenging than the triangle pose. Begin in Warrior I position (legs in a lunge position, front knee bent and in line with front foot, arms reaching high). Straighten your front leg as you lift your back leg straight up and drop your chest parallel, keeping your arms overhead. You may not go very high at first – that’s okay, Puckett says. “Lift only as high as you can while keeping your hips square and your body in line.” Your body should feel like a teeter-totter and look like a big capital T. Work to make your line longer, smoother and more stable.
ADVERTISEMENT
4. Turn your “fun swim” into a real workout

Time Frame: 2 weeks (swimming 2 – 3 times/week)
Benefit: Build cardiovascular endurance and get a great total-body workout that’s easy on your joints. It’s all about “stroke thoughts,” says Terry Laughlin, founder and head coach of Total Immersion Swimming based in New Paltz, NY. “You develop your form one mini-skill at a time,” he says, through being mindful of each stroke.
Step 1: Hang your head. “Release your head’s weight until you feel the water supporting it entirely,” Laughlin says. Look straight down instead of forward. You’ll feel lighter and float easier.
Step 2: Breathe as early in the stroke cycle as you can. Follow your shoulder back for the inhale, which is sharp and quick. Focus your attention on your exhale by blowing bubbles the whole time your face is in the water, he says.
Step 3: Try ladder sets (adding a lap on sequential repeats). Laughlin recommends starting with a single “lap” (swimming the length of the pool from one end to the other, which is typically 25 yards). The next workout, try two laps connected (swimming from one end of the pool to the other, taking a few recovery breaths after the first lap, and then swimming back (for a total of 50 yards) – be sure to notice how your second lap felt. Only move on to a third connected lap (75 yards total) when your second lap feels as good as your first, and so on.
Step 4: Once you’ve got it down, challenge yourself by setting a stopwatch for 30 minutes and seeing how many laps you can fit in, aiming to beat your record each time. But remember: Never lose sight of your form and breathing at the expense of beating your record. If you need to stop and regroup, go ahead.
ADVERTISEMENT
5. Run 20 minutes without stopping

Time Frame: 8 weeks
Benefit: Build cardiovascular endurance and get closer to completing a 5K. The best way to build up your endurance is to take it slow and easy with a walk-run interval mix, says Jason Karp, PhD, San Diego-based exercise psychologist and running coach (RunCoachJason.com). This way, you’ll increase your calorie burn, boost your confidence and continually challenge your body.
Week 1: Run 3 x 5 minutes (run for 5 minutes, 3 times) with 2 minutes walk recovery between each run
Week 2: Run 3 x 7 minutes, with 2 minutes walking recovery
Week 3: Run 3 x 9 minutes, with 2 minutes walking recovery
Week 4: Run 2 x 12 minutes, with 3 minutes walking recovery
Week 5: Run 2 x 15 minutes, with 3 minutes walking recovery
Week 6: Run 2 x 15 minutes, with 2 minutes walking recovery
Week 7: Run 2 x 17 minutes, with 2 minutes walking recovery
Week 8: Run 20 minutes without stopping
ADVERTISEMENT
6. Learn to love broccoli

Time Frame: 2 weeks, with 2 – 3 attempts each week
Benefit: A great addition to your clean-eating plan, broccoli is loaded with antioxidants that fight cancer and promote a healthy immune system. A single cup of broccoli has 200 percent of your daily needs of vitamins C and K! It also has fiber, which helps you feel fuller.
Step 1: First, understand why you don’t like broccoli, suggests Washington, DC, sports nutritionist Rebecca Scritchfield, MA, RD. Do you have a bad childhood memory of grey, overcooked broccoli, or do you just assume you don’t like it? Three strategies that might help you along the way:
• Try it raw. If you don’t love warm, tasty broccoli (we admit we’re a little biased!), give it a try by eating it uncooked. You can add a “dip” such as fat-free Greek yogurt sprinkled with your favorite herb.
ADVERTISEMENT
• Make it a sideshow: Add it to foods you already enjoy (such as soups and casseroles), and try cutting it up into smaller pieces and adding them to your favorite salad.
• Cook it right: The best way to cook broccoli (if you’re not adding it to something like a casserole) is to steam it for about 3 minutes, just until it’s bright green. That’s when the vitamins and minerals are locked in – any more than that, and you start losing them. Sprinkle with thyme, a lemon juice/salt/pepper blend, or even red pepper flakes. For more inspiration, try our Broccoli with Orange Sauce recipe.
7. Mix the perfect protein shake

The name of the game is keeping it simple, Scritchfield says – at least to start. “I use fat-free milk or fat-free plain or Greek yogurt as a base.” Greek yogurt is especially good because it’s so high in protein (10 grams per half cup). Then she adds ice, fruit and blends.
ADVERTISEMENT
Once you get the basics down, mix in whey protein powder. “If you decide to use whey protein powder, go for a simple supplement without a lot of added ingredients – it could make your shake taste chalky,” she says. Flaxseed, which is full of heart-healthy omega-3s, is also good to experiment with. But you’ll need to grind it, and use it right away (otherwise it starts losing the omega-3s). Scritchfield likes to use banana in all her shakes. For a chocolaty treat try banana and 100% cocoa powder, or almond or cashew butter for a nutty taste. Try our Pina Colada Protein Shake.