Published November 13, 2019 05:39PM
You Don’t Know Squat
The classic squat may be your go-to, foolproof booty exercise, but do you do the same one over and over? Time to go beyond the basics to tighten your booty.
Fess up! Are you a superstar squatter, or does something feel not so fabulous when you hit the squat rack? Since no two bodies are built the same, not everyone is going to relish the same sorts of exercises, and this rings especially true for squats. Fortunately, there are several variations on the classic squat, and if one doesn’t seem to feel right for you, there’s a long line of others waiting to be tried.
Oxygen makes it easy for you by breaking down five common squats. Test-drive a couple of these alternatives for yourself, sidelining those you don’t like and embracing those you do, adding them into your workout. At the very least, you’ll have a pocket full of options for when the dudes are hogging the squat rack.

Back Squat
Back squats are the meat and potatoes of the squatting world, and chances are if you’ve slung a barbell across your back and hit ass-to-grass, you’ve done a proper back squat.
The Upside: Mechanically, back squats allow you to lift the heaviest loads because the bar rests along the axial skeleton and the scapulae, offering a wide base of support and balance. Translation: more potential calories burned and a greater (and faster) increase in strength.
To be a badass back squatter, you’ve got to have good shoulder and upper-chest mobility to hold the bar in the proper position (across your upper back and traps with your chest up and your elbows down), as well as a strong core to support the load and protect your back as you descend.
The Downside: Back squats can cause a forward trunk lean, especially when compared to other lifts, putting a lot of shear forces on the lower back.
Keep in Mind: If you’ve got a history of lumbar spine issues, warm up thoroughly and pay close attention to form or default to an alternate squatting style.
ADVERTISEMENT
The How-To
Setup: Stand with your feet shoulder-width apart, toes turned out 8 to 10 degrees, and hold a barbell across your upper traps with your elbows pointing down, not back. Imagine pulling the bar apart with your hands to maintain upper-back and trunk tension and create a stable base of support for the bar.
Move: Inhale, then kick your hips back and bend your knees to lower into a deep squat, keeping your chest lifted and your elbows down. Drive through your heels to power back up, exhaling as you rise back to the start.

Overhead Squat
Pick up a prepubescent teenager. Hold her horizontally overhead and do a squat as she takes a selfie. Share resulting selfie on Instagram. Anticipate many likes.
ADVERTISEMENT
True overhead squats can be equally as awkward as this scenario, and even if you don’t have a sulky teenager with a selfie stick, squatting with a heavy load overhead is super demanding. You’ve got to have fabulous mobility at the hips and shoulders and rock-solid core strength to move properly through space while balancing a barbell over your nugget.
The Upside: It is fantastic for building overall coordination and total-body synergistic strength.
The Downside: You can only squat as much weight as you can hold overhead, making this move a poor choice for building leg strength and size.
Keep in Mind: If you have a history of shoulder issues or are so inflexible that you can’t reach behind your head to fasten a necklace, this is probably not the lift for you.
ADVERTISEMENT
The How-To
Setup: Stand with your feet shoulder-width apart, toes turned out about 8 to 10 degrees, and hold a barbell in a snatch grip straight up overhead. If you were to look at yourself from the side, you should be able to draw a straight line from your hands through your ankles.
Move: Inhale, kick your hips back and squat as low as you can, keeping the barbell and your arms perpendicular to the floor at all times. Exhale as you drive through your heels to return to the start.
How to set up your snatch grip: Hold the barbell in front of you with your hands spaced wide. Lift one knee up in front of you under the barbell; the bar should hit right in the crease of your hip. If it does not, adjust your hands wider or narrower until it hits that sweet spot, then you’re ready to go.

ADVERTISEMENT
Front Squat
Front squats are the kissing sister of back squats and are quite similar mechanically.
The Upside: Since the load is the front of your head, your torso remains more vertical, eliminating the potential for excessive forward lean and making it kinder and gentler on your back. Front squats also encourage more knee flexion and greater depth, thereby calling more on the quads to get you out of the hole.
The Downside: This front loading also means less gluteal and hamstring involvement, so if you’re looking to build that Beyoncé bubble butt, you’re squatting up the wrong tree. Front squats also call for good wrist mobility to hold the barbell in the front rack position, as well as excellent ankle flexibility as you get low.
Keep in Mind: You’ve got to have good thoracic extension, because if you lean forward like the Tower of Pisa, you’ll dump the bar.
ADVERTISEMENT
The How-To
Setup: Stand with your feet shoulder-width apart, toes turned out about 8 to 10 degrees. Hold a barbell in the front rack position: bar resting across your clavicle and upper chest (not your shoulders), elbows lifted in front of you, fingertips loosely holding underneath the barbell. It’s OK to remove the pinkie finger and thumb from under the bar, if needed.
Move: Keep your elbows high and lifted and your chest up as you inhale, then kick your hips back and descend into your deep squat. Drive through your heels and exhale as you return to the start.

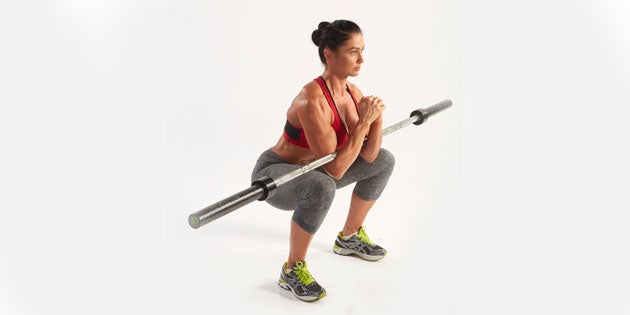
Zercher Squat
This squat variation was the brainchild of Ed Zercher, a powerlifter from the 1930s who devised it to compensate for his lack of a squat rack.
ADVERTISEMENT
The Upside: As it turns out, Zercher’s squat is a decent deviation, encouraging a hip-dominant squatting action while forcing the lifter to maintain an upright posture. It also helps reduce the compressive forces on the spine by taking the load off your back, and because the bar threatens to pull you forward, your core works double time to keep you upright, making it murder on your abs.
The Downside: As the weight gets heavier, your arms may surrender early.
Keep in Mind: There’s a ceiling on how much you can physically hold and, therefore, how much you can squat with this variation.
The How-To
Setup: Stand with your feet shoulder-width apart, toes turned out 8 to 10 degrees, and cradle a barbell in the crook of your arms with your hands interlocked. Your chest should be lifted, shoulders back, abs tight.
Move: Keep the bar close and your knuckles facing upward as you inhale and kick your hips back, descending to your bottommost range while keeping your torso vertical. Exhale and drive through your heels, extending your legs and hips to return to the start.

ADVERTISEMENT
Hip-Belt Squat
OK, we’ll concede that this move looks weird, but for those with back problems, it could be your saving grace.
The Upside: Because the load is attached to a belt and hangs below your feet, you stand taller, protecting your back from the weight of a top-loaded barbell. In addition, the focus is exclusively on the lower body with minimal upper-body and core engagement.
The Downside: It’s a bit of a hassle to set up — threading the chain around the weight, fastening it to the belt, stepping onto the platform — and you won’t be able to lift as heavy as you would with a barbell squat simply because the belt will succumb to gravity and start to slide off.
Keep in Mind: This move requires you to gear up and plan a bit, and you’ll need a weight belt and adequate space above, below and around you to perform it properly.
ADVERTISEMENT
The How-To
Setup: Set up two boxes or steps spaced apart as wide or a little wider than your normal squat stance. Secure a hip belt around your waist, then attach a plate or kettlebell to the belt with a chain or strap. Stand with a foot on each box and assume your squat stance with your toes turned out slightly and your arms crossed over your chest or extended in front of you for balance. The weight should hang directly down between your legs.
Move: Inhale and then kick your hips back, descending slowly until you reach your full, comfortable depth. Stand back up and squeeze your glutes at the top as you exhale.